2025年2月

一、环境准备

  1. 下载mingw
    MinGW官网:https://www.mingw-w64.org/downloads/
    GitHub下载地址:https://github.com/niXman/mingw-builds-binaries/releases

    在下载页面找到MinGW-W64-builds关键字
  2. 将mingw路径添加到Path环境变量
    系统->高级系统设置->环境变量->用户或系统变量Path->"D:\software\mingw64\bin"
    安装验证

    PS C:\Users\tony> gcc -v
    Using built-in specs.
    COLLECT_GCC=D:\software\mingw64\bin\gcc.exe
    COLLECT_LTO_WRAPPER=D:/software/mingw64/bin/../libexec/gcc/x86_64-w64-mingw32/14.2.0/lto-wrapper.exe
    Target: x86_64-w64-mingw32
    Configured with: ../../../src/gcc-14.2.0/configure --host=x86_64-w64-mingw32 --build=x86_64-w64-mingw32 --target=x86_64-w64-mingw32 --prefix=/mingw64 --with-sysroot=/c/buildroot/x86_64-1420-posix-seh-msvcrt-rt_v12-rev1/mingw64 --enable-host-shared --disable-multilib --enable-languages=c,c++,fortran,lto --enable-libstdcxx-time=yes --enable-threads=posix --enable-libgomp --enable-libatomic --enable-lto --enable-graphite --enable-checking=release --enable-fully-dynamic-string --enable-version-specific-runtime-libs --enable-libstdcxx-filesystem-ts=yes --disable-libssp --disable-libstdcxx-pch --disable-libstdcxx-debug --enable-bootstrap --disable-rpath --disable-win32-registry --disable-nls --disable-werror --disable-symvers --with-gnu-as --with-gnu-ld --with-arch=nocona --with-tune=core2 --with-libiconv --with-system-zlib --with-gmp=/c/buildroot/prerequisites/x86_64-w64-mingw32-static --with-mpfr=/c/buildroot/prerequisites/x86_64-w64-mingw32-static --with-mpc=/c/buildroot/prerequisites/x86_64-w64-mingw32-static --with-isl=/c/buildroot/prerequisites/x86_64-w64-mingw32-static --with-pkgversion='x86_64-posix-seh-rev1, Built by MinGW-Builds project' --with-bugurl=https://github.com/niXman/mingw-builds LD_FOR_TARGET=/c/buildroot/x86_64-1420-posix-seh-msvcrt-rt_v12-rev1/mingw64/bin/ld.exe --with-boot-ldflags='-pipe -fno-ident -L/c/buildroot/x86_64-1420-posix-seh-msvcrt-rt_v12-rev1/mingw64/opt/lib -L/c/buildroot/prerequisites/x86_64-zlib-static/lib -L/c/buildroot/prerequisites/x86_64-w64-mingw32-static/lib  -Wl,--disable-dynamicbase -static-libstdc++ -static-libgcc'
    Thread model: posix
    Supported LTO compression algorithms: zlib
    gcc version 14.2.0 (x86_64-posix-seh-rev1, Built by MinGW-Builds project)
  3. 安装vscode
  4. 安装vscode插件
  5. C/C++ for Visual Studio Code
    2025-02-25T02:12:04.png
  6. VSCode C/C++ Runner
    2025-02-25T02:12:26.png
  7. 编写helloworld.c

    #include <stdio.h>
    
    int main(){
     printf("Hello World! \n");
    
     return 0;
    }
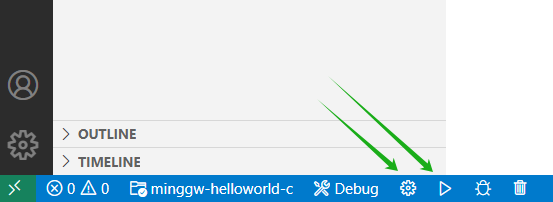
  8. 编译运行
    2025-02-25T02:14:28.png

安装条件

  • Maven需要本机安装Java环境、必须包含JAVA_HOME环境变量

安装步骤

  1. 从官网下载maven安装包,解压后放在D:\software\apache-maven-x.x.x目录;
  2. 添加MAVEN_HOME环境变量;修改path环境变量,新增%MAVEN_HOME%\bin;
    2025-02-10T09:34:30.png
  3. 命令行测试

    mvn -v 
    # 输出版本信息即可,如果错误,请仔细检查环境变量即可!
    # 友好提示,如果此处错误,绝大部分原因都是java_home变量的事,请仔细检查!!
  4. 修改配置文件
    主要有三个配置需要修改:1.本地仓库位置;2.添加国内镜像源;3.Maven默认编译项目的jdk版本
    4.1. 配置本地仓库位置

    <!-- conf/settings.xml 55行 -->
    <localRepository>D:\repository</localRepository>

    4.2. 添加国内镜像源

    <!--在mirrors节点(标签)下添加中央仓库镜像 160行附近-->
    <mirror>
     <id>alimaven</id>
     <name>aliyun maven</name>
     <url>http://maven.aliyun.com/nexus/content/groups/public/</url>
     <mirrorOf>central</mirrorOf>
    </mirror>

    4.3. 配置jdk17版本项目构建

    <!--在profiles节点(标签)下添加jdk编译版本 268行附近-->
    <profile>
     <id>jdk-17</id>
     <activation>
       <activeByDefault>true</activeByDefault>
       <jdk>17</jdk>
     </activation>
     <properties>
       <maven.compiler.source>17</maven.compiler.source>
       <maven.compiler.target>17</maven.compiler.target>
       <maven.compiler.compilerVersion>17</maven.compiler.compilerVersion>
     </properties>
    </profile>
  5. idea配置本地Maven

    idea工具默认自带Maven配置软件,但是因为没有修改配置,建议替换成本地配置好的maven!
    file -> settings -> build -> build tool -> maven

简介

阿里云Maven中央仓库为阿里云云效提供的公共代理仓库,帮助研发人员提高研发生产效率,使用阿里云Maven中央仓库作为下载源,速度更快更稳定。

配置方法

1. Maven配置

打开 Maven 的配置文件(windows机器一般在maven安装目录的conf/settings.xml),在标签中添加 mirror 子节点:

<mirror>
    <id>aliyunmaven</id>
    <mirrorOf>*</mirrorOf>
    <name>阿里云公共仓库</name>
    <url>https://maven.aliyun.com/repository/public</url>
</mirror>

如果想使用其它代理仓库,可在节点中加入对应的仓库使用地址。以使用spring代理仓为例:

<repository>
    <id>spring</id>
    <url>https://maven.aliyun.com/repository/spring</url>
    <releases>
        <enabled>true</enabled>
    </releases>
    <snapshots>
        <enabled>true</enabled>
    </snapshots>
</repository>

2. Gradle配置

在 build.gradle 文件中加入以下代码:

allprojects {
    repositories {
        maven { url 'https://maven.aliyun.com/repository/public/' }
        mavenLocal()
        mavenCentral()
    }
}

如果想使用 maven.aliyun.com 提供的其它代理仓,以使用 spring 仓为例,代码如下:

allprojects {
    repositories {
        maven { url 'https://maven.aliyun.com/repository/public/' }
        maven { url 'https://maven.aliyun.com/repository/spring/'}
        mavenLocal()
        mavenCentral()
    }
}